
Payrite User Manual
Payrite is a simple web application which has a built-in timesheet manager to manage employee working hour details.
The timesheet in payrite can be managed either by the accountant or by the client.
This is a detailed user manual for payrite. A pdf version of this user manual can be downloaded here.
How to use Payrite
- Add client (only accountants)
- add employee
- fix pay details
- set up a pay period
- start entering employee working hours
- submit for payroll processing
1. How to login to the payrite application?
On purchasing our application, we will provide you a user account.
- Go to the payrite site, www.payrite.ca
- Fill in the user id and password fields and
- Click on the login button.
This will take you to the CLIENTS page (for accountants). Now you can add your clients and create login accounts for clients.
Accountants have higher control and administrative rights over the application, whereas clients have limited rights.
Clients can also login to the application by going to www.payrite.ca and use the User Id and password provided by their accountants.
2. How to add a new client?

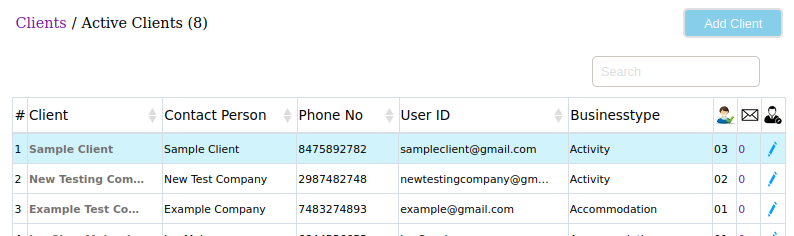
- Click on the CLIENTS tab at the top of the payrite application/page. This shows a list of all the Clients/Active clients.
- In the top right corner click on the ‘Add Client’ button. A new form will appear with three sections.
- Account Profile
- Client Details
- Pay Frequency Settings.
- Fill in all three tabs/sections which includes client contact details, client login credentials, pay frequency. (see also how to set up a new pay frequency). Click on the Save button to update the details.
Provide the User Id and Password created in the Account profile to the client, so the client can add his employees and enter employees working hour details.
3. How to add an employee?
(Accountants are required to enter steps 1&2. Clients can start at step 3)
- Click on the CLIENTS tab at the top of the payrite application/page. This shows a list of all the Clients/Active clients.
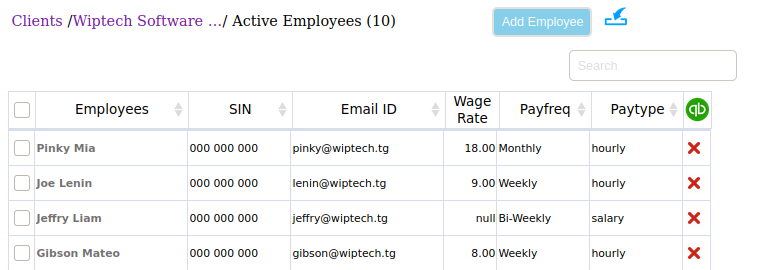
- Click on the Client name for whom the employee is to be added. A new page will open which lists all the Active employees of the client.
- In the top right corner click on the ‘Add Employee’ button. A new form will appear with three sections.
- Contact Info
- Pay Details
- Direct Deposit
- Fill in all three tabs/sections which include employee SIN number, Contact details, pay information such as wage rate, bank details etc. Click on the Save button to update the details. (see also setup employee pay details)
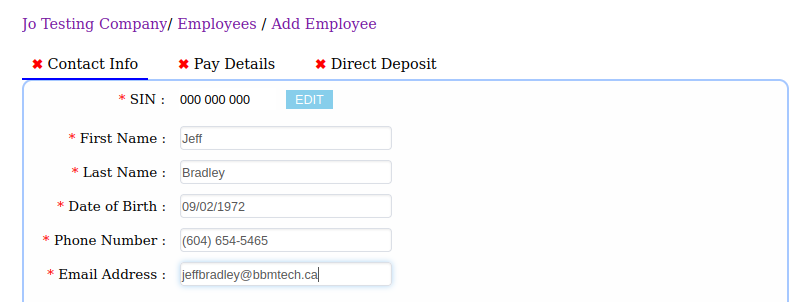
Note: Clients can also add their employees from their account.
4. How to view/enter hours in the timesheet for a pay period.
(Accountants are required to enter steps 1&2. Clients can start at step 3)
- Click on the CLIENTS tab at the top of the payrite application/page. This shows a list of all the Clients/Active clients.
- Click on the Client name
- Click on the TIMESHEETS tab at the top of the payrite application/page.
It displays a list of ongoing pay periods.
- Click on the Pay Period from the list.
- Enter the hours and Click save button (see also entering time, submit a timesheet)
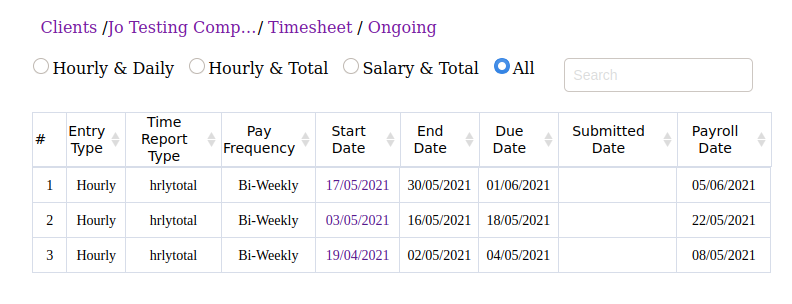
Note: In the timesheet, pay periods are auto generated based on the employee pay details
such as pay type, pay frequency, time report start date, time reporting type. (To see these details click on EMPLOYEES tab, click on employee name and see pay details)
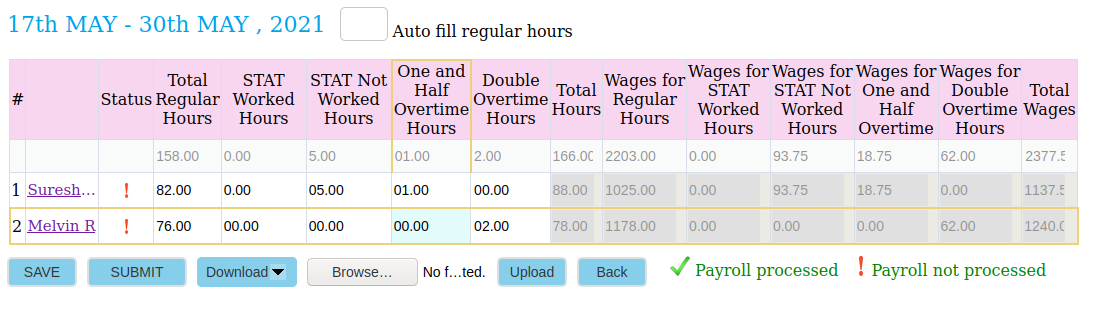
5. Entering time in the timesheet for employees whose pay type is Total hours per pay period
This is possible only if the employees Time reporting type is Total hours per pay period (see employee pay details, Daily hours per pay period, Pay type is salary)
(Accountants are required to enter steps 1&2. Clients can start at step 3)
- Click on the CLIENTS tab at the top of the payrite application/page. This shows a list of all the Clients/Active clients.
- Click on the Client name
- Click on the TIMESHEETS tab at the top of the payrite application/page. It displays a list of ongoing pay periods.
- Click on the Pay Period from the list with the time reporting type hrlytotal.
- Add the required information such as worked hours, overtime hours, double time hours for each employee.
- Click on the Save button
* (Note: The submit button is for final submission once the pay period is complete. Once submitted, the pay hours on the pay period cannot be modified. Also Hours will be automatically submitted to quickbooks for payroll processing. Check the employees pay hours before submitting the pay periods.)
6. Entering time in the timesheet for employees whose pay type is Daily hours in the pay period
This is possible only if the employees Time reporting type is Daily hours (see employee pay details, Total hours per pay period, Pay type is salary)
(Accountants are required to enter steps 1&2. Clients can start at step 3)
- Click on the CLIENTS tab at the top of the payrite application/page. This shows a list of all the Clients/Active clients.
- Click on the Client name
- Click on the TIMESHEETS tab at the top of the payrite application/page. It displays a list of ongoing pay periods.
- Click on the Pay Period from the list with the time reporting type hrlydaily.
- A calendar type table will appear. Add hours worked by each employee for each day
- Click on the Save button
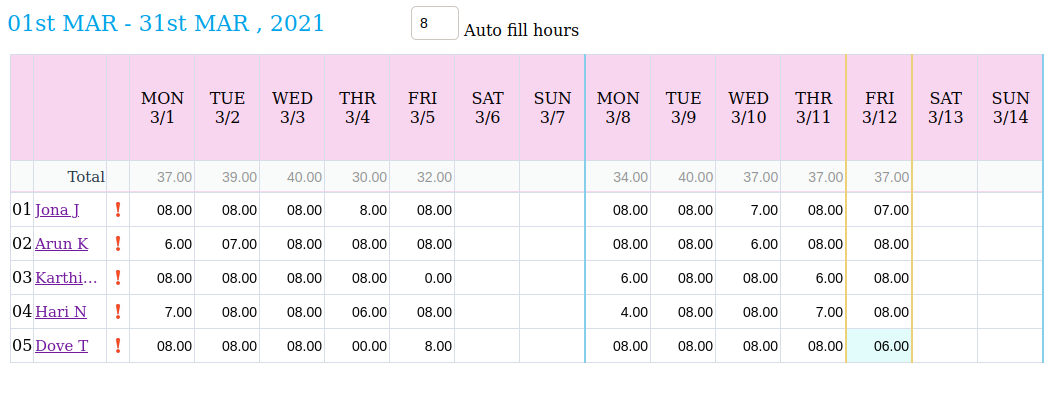
Note: The hours added will be automatically split to regular time, overtime and double time.
Autofill option can be used to quick fill hours.
Tick the Show wage calculations check box to see the wage rate and other details
6A. Entering time in the timesheet for employees whose pay type is Salary
This is possible only if the employees pay type is salary (see employee pay details, Total hours per pay period, Daily hours per pay period)
(Accountants are required to enter steps 1&2. Clients can start at step 3)
Click on the CLIENTS tab at the top of the payrite application/page. This shows a list of all the Clients/Active clients.
- Click on the Client name
- Click on the TIMESHEETS tab at the top of the payrite application/page. It displays a list of ongoing pay periods.
- Click on the Pay Period from the list with the time reporting type salary.
- A calendar type table will appear. Add hours worked by the each employee for each day
- Click on the Save button

Note: The hours added will be automatically split to regular time, overtime and double time.
Autofill option can be used to quickly fill hours.
Tick the Show wage calculations check box to see the wage rate and other details
7. How to add users to manage client’s payroll?
Users can be added by accountants to manage their clients.
- Click on the USER ACCOUNTS tab at the top of the payrite application
- The active users list will be displayed.
- Click on the ‘Add User’ () button at the right top
- An add user form will appear.
- Fill in the Name, user id and password field and click on submit button.

Now click on the USER ACCOUNTS tab. The newly added user will be listed in the Active users list.
8. How to add/modify employee bank details?
- Click on Clients tab
- Select the client name
- Select the employee name
- Select Direct deposit tab
- Click the Edit button at the bottom right
- Choose the enrolled option in direct deposit
- Fill in the branch no., Institution no., and account no.
- Click save button at the bottom of the screen
9. How to submit a timesheet to Quickbooks for payroll processing?
(Steps 1&2 required only for accountants. Clients can proceed from step 3)
- Click on the CLIENTS tab at the top of the payrite application/page. This shows a list of all the Clients/Active clients.
- Click on the Client name
- Click on the TIMESHEETS tab at the top of the payrite application/page.
It displays a list of ongoing pay periods.
- Double click on the Pay Period from the list or click on the pay period start date.
- Verify the employees’ pay hours and fill all required fields.
- Click on the submit button and the hours will be updated in quickbooks.
Note: Once submitted the pay hours on the pay period cannot be modified.
10. How to view/modify client profile?
- Click on the CLIENTS tab at the top of the payrite application/page. This shows a list of all the Clients/Active clients.
- Go to the client and click on the edit icon at the right side. A new form will appear with three sections.
- Account Profile
- Client Details
- Pay Frequency Settings .
- Click the edit button at the bottom right side.
- Fill in the required changes and click on the Save button to update the details.
11. How to view/modify employee profile?
(Clients can click on EMPLOYEES tab at the top of the payrite application and then proceed from step 3)
- Click on the CLIENTS tab at the top of the payrite application/page. This shows a list of all the Clients/Active clients.
- Click on the client name. A new page will open which lists all the Active employees of the client.
- Click on the employee name in the list. A new form will appear with three sections. .
- Contact Info
- Pay Details
- Direct Deposit
- Click the edit button at the bottom right side.
- Fill in the required changes and click on the Save button to update the details.
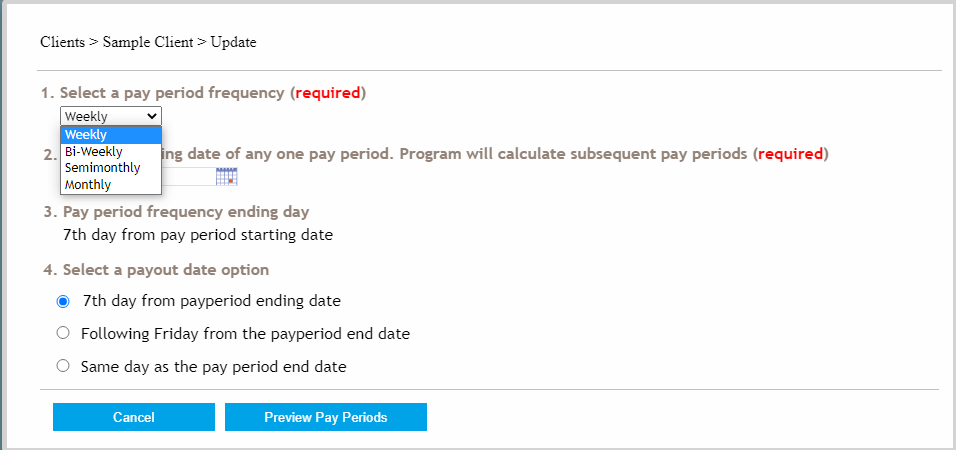
12. How to set up multiple pay frequencies for a client?
- Click on the CLIENTS tab at the top of the payrite application/page. This shows a list of all the Clients/Active clients.
- Go to the client and click on the edit icon at the right side. A new form will appear with three sections.
- Click on Pay Frequency Settings.
- Click on the setup new pay frequency button.
- Select the pay period frequency for the client. There are four options: Weekly, Bi-weekly, Semimonthly, and Monthly.
- Select the start date of the pay period
- Choose one of three options for payout date
- 7th day from pay period
- Following Friday from pay period end date
- same day as the pay period end date
- Click on Preview pay Periods button
- Verify the pay period summary in the popup window. Click the back button if you wish to change or click on the Save & Close button.
Multiple pay groups shown in the image below

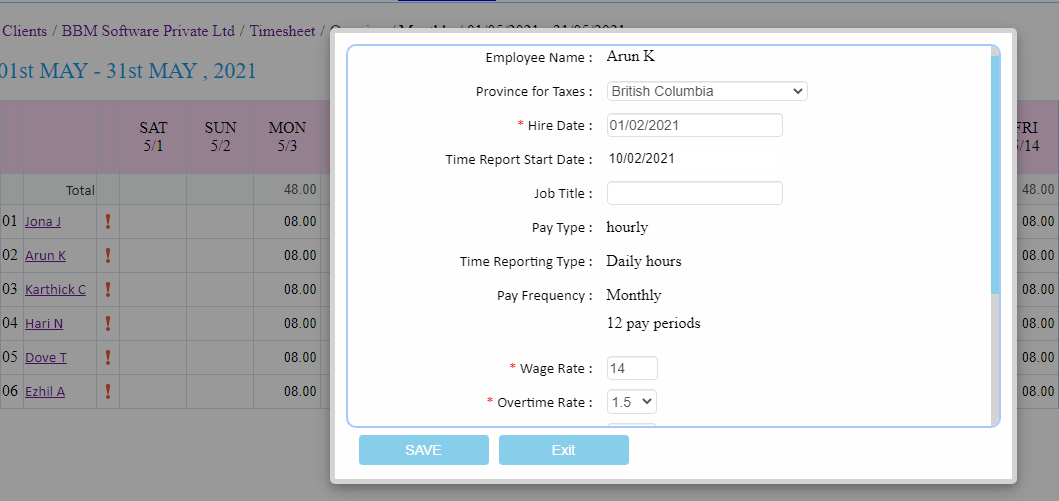
13. Edit employee Pay details on the Timesheet page
- Select the client
- Click on the TIMESHEET tab
- Select the pay period
- Click on the employee name
- Click on the EDIT button
- Change the wage rate and other details as required. Then select the effective date Click ok button if asked.
- Click on save button
14. How to make users active or inactive?
- Click on the USER ACCOUNTS tab
- Click on the edit icon
 on the client name
 - Select the inactive option
- Click on the save button
- To reactivate the inactive users, click on the inactive users link
- Click on the reactive tick () icon on the specific user.
- Click ok and then go to the active users and confirm if the user is set to active

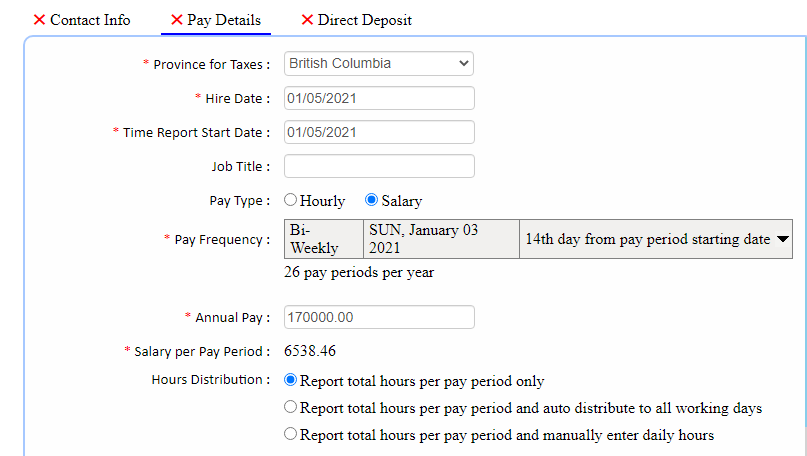
15. How to add an employee whose pay type is salary?
(Accountants are required to enter steps 1&2. Clients can start at step 3)
- Click on the CLIENTS tab at the top of the payrite application/page. This shows a list of all the Clients/Active clients.
- Click on the Client name for whom the employee details are to be added. A list of all the Active employees will be displayed.
- Now in the EMPLOYEES tab click on the ‘Add Employee’ button at the top right corner. A new form will appear with three sections.
- Contact Info
- Pay Details
- Direct Deposit
- Fill in all the required fields in contact info.
- Go to pay details tab
- Fill in the required information, and in the pay type select salary. (see definitions to know more about pay types, and time reporting types)
- Choose the required pay frequency. There are four pay frequencies
- Monthly
- Weekly
- semi-monthly
- Bi-weekly
- Enter the Annual pay amount. Click on the Save button.
- Fillin the Direct Deposit tab.
- Click on the Save button to add the details.
16. How to view/modify employee pay details?
(Accountants are required to enter steps 1&2. Clients can start at step 3)
Click on the CLIENTS tab at the top of the payrite application/page. This shows a list of all the Clients/Active clients.
- Click on the Client name for whom the employee details are to be added. A list of all the Active employees will be displayed.
- Now in the EMPLOYEES tab click on the ‘Add Employee’ button at the top right corner. A new form will appear with three sections.
- Contact Info
- Pay Details
- Direct Deposit
- Fill in all the required fields in contact info.
- Go to the pay details tab. (employee whose pay type is a Salary)
- Fill in the required information, and in the pay type select Hourly. (see definitions to know more about pay types, and time reporting types)
- Select either of the two time reporting types
- Daily hours
- Total hours per pay period
- Choose the required pay frequency.
- Fill other important wage information such as
- Wage Rate
- Overtime Rate
- Double Time Rate
- STAT Worked Rate
- STAT Not Worked Rate
- Vacation Rate
- Vacation Accrued
- Additional Taxes to be deducted
- Fill in the Direct Deposit tab. Click on the Save button to add the details.

17. How to change the client login password?
(This can be done by an accountant or a client)
- Click on the CLIENTS tab at the top of the payrite application/page. This shows a list of all the Clients/Active clients.
- Go to the client and click on the edit icon at the right side or click on CLIENT DETAILS tab at the top of the payrite application. A new form will appear with three sections.
- Account Profile
- Client Details
- Pay Frequency Settings.
- Click on Account profile
- Now under the payrite logon credentials, set up a new password
- Click on the save button.
- Now the client can sign in with the new password for their account.

18. How to store important employee documents under their user profile?
(Clients can click on EMPLOYEES tab at the top of the payrite application and then proceed from step 3)
- Click on the CLIENTS tab at the top of the payrite application/page. This shows a list of all the Clients/Active clients.
- Click on the client name. A new page will open which lists all the Active employees of the client.
- Click on the employee name in the list. A new form will appear with three sections. .
- Contact Info
- Pay Details
- Direct Deposit
- Documents
- Click on the documents
- Click choose file button
- Select the location of the file in the file browser window.
- Click upload button
- The document will be uploaded.
- Click on the edit button to change the uploaded document Type, name, number etc. There are other options to preview, download or delete the files if required.

19. How to set up quickbooks sync?
- Goto quickbooks desktop and open the company
- Copy the company file path from quickbooks
- Now Click on the CLIENTS tab at the top of the payrite application/page. This shows a list of all the Clients/Active clients.
- Click on the same client and click on the edit icon at the right side. A new form will appear with three sections.
- Account Profile
- Client Details
- Pay Frequency Settings.
- Click on client details tab
- Click on the edit button
- Paste it in the Quickbooks data path text box
- Click on the save button
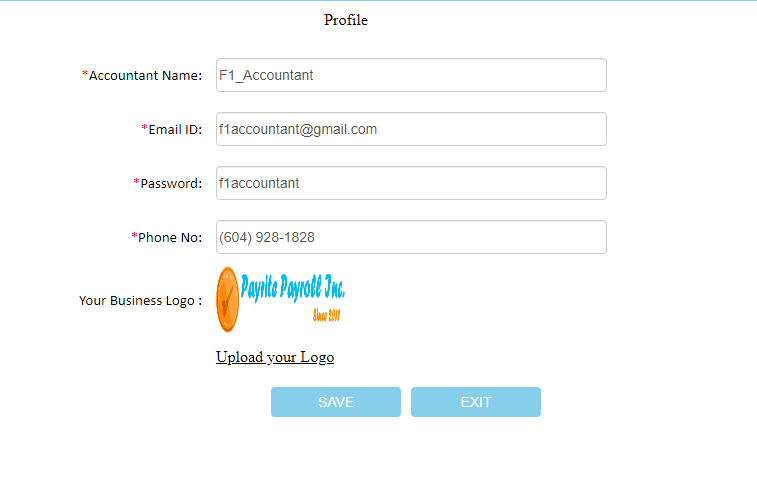
20. How to change the accountant’s profile password, email id and other information?
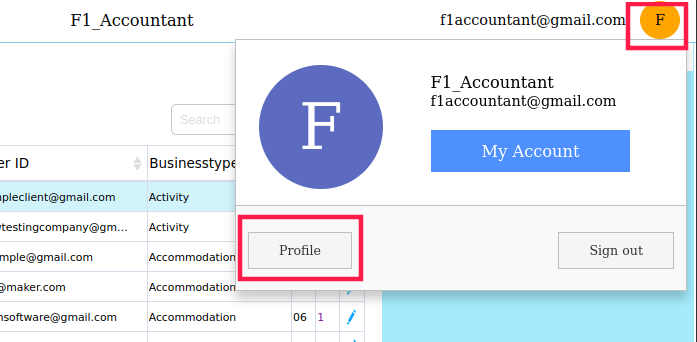
- Click on the user image at the top right of the payrite application.
- Click on the profile button.
- Now update the new password for your account.
- Add other details if required such as Accountant name, Email ID, Phone no., Business logo.
- Click on save button
21. How to communicate with clients through payrite messenger?
- Click on the CLIENTS tab at the top of the payrite application.
- Click on the client name.
- Now click the textbox in the messaging sidebar at the right bottom of the payrite application.
- Enter the message you wish to communicate to the client.
- Press enter to send the message.
- The Messages tab lists all the previous chats with the clients. Any unread messages sent by the client will be in the New tab.
22. How to import or export a timesheet?
(Accountants are required to enter steps 1&2. Clients can start at step 3)
- Click on the CLIENTS tab at the top of the payrite application/page. This shows a list of all the Clients/Active clients.
- Click on the Client name
- Click on the TIMESHEETS tab at the top of the payrite application/page. It displays a list of ongoing pay periods.
- Click on the Download button at the bottom.
- Choose the Download Timesheet Template option and download the excel sheet.
- Fill the employee pay hours on the downloaded excel sheet and save.
- Click the Choose File button, a browser window is open.
- Select the saved excel sheet file path.
- Click on the Upload File button.
- Click on the Save/Submit button.
23. How to view submitted pay periods on the timesheet?
- Click on the CLIENTS tab at the top of the payrite application/page. This shows a list of all the Clients/Active clients.
- Click on the name of the client
- Now click on TIMESHEETS at the top of the page
- A list of pay periods will be displayed
- At the left side you can see three options
- Ongoing timesheet
- Submitted timesheet
- Completed timesheet
- Click on the desired timesheet
- Now a list of timesheets will appear
- Click to view the timesheet
24. How to import employees to the client?
(Accountants are required to enter steps 1&2. Clients can start at step 3)
Click on the CLIENTS tab at the top of the payrite application/page. This shows a list of all the Clients/Active clients.
- Click on the Client name for whom the employee details are to be added. A list of all the Active employees will be displayed.
- Now in the EMPLOYEES tab click on the ‘Import Icon’ at the top right corner. A new form will appear.
- Click on the Download Import Template button on the new form.
- Fill the new employees details on the downloaded excel sheet and save.
- Click the Choose File button, a browser window is open.
- Select the saved excel sheet file path.
- Click on the Upload File button.
- Choose Pay Frequency and Time Report start date on the comboboxes.
- Click on the Save Employees button.
25. Filters, search and sort
|
Search clients by Name, Company name, business type, phone no. etc., and sort () by category |
|
|
|
|
|
Search clients by Name, SIN, Email etc.. And sort () by category |
|
|
|

-
Filter clients by name or by business type, status
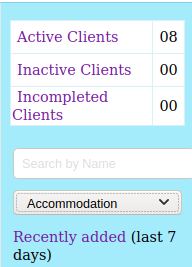
-
Filter employees by name, date added, Pay frequency
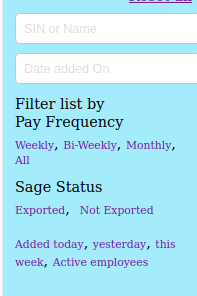
-
Filters for timesheets, pay periods, status

(Upcoming feature) How to change the employee pay group/frequency?
- Click on the CLIENTS tab at the top of the payrite application/page. This shows a list of all the Clients/Active clients.
- Go to the client and click on the edit icon at the right side. A new form will appear with three sections.
- Click on Pay Frequency Settings.
Acronyms
QBD - Quick Books Desktop
SIN - Social Insurance Number
EXT - extension
hrlytotal - Hourly total
hrlydaily - Hourly daily
Definitions
Pay period frequency
- Bi-weekly - Payment is processed every two weeks
- Weekly - Payment is processed every seven days
- Semimonthly - Payment is processed at the middle of the month
- Monthly - Payment is processed every month
Pay period - Pay period is the number of days between two calendar dates, i.e. a start date and an end date for which an employee’s payroll is processed.
E.g Lets take a Bi-weekly pay period. Assume the pay period start date is 3rd which is on wednesday. So a Bi-weekly pay period starts on 3rd and ends on 17th.
Timesheet - Timesheet is the place where employee working hour details are entered and wages are calculated for a pay period.
Payout date - Is the date on which the payments are made for the recently completed pay period.
Pay group - Pay group is a group of employees belonging to a particular pay period
Pay frequency - is the frequency in which the payments are made. It can be weekly, Bi-weekly, semimonthly and monthly.
Pay type
- Hourly - Wage is calculated based on the number of hours worked by the employee
- Salary - A fixed amount agreed to pay an employee for each pay period.
Annual Pay - employee wage for an year
Wage rate - is the amount paid per hour
Time reporting type
- Daily Hours- Wage is calculated based on the number of hours worked on each day by the employee.
- Total hours per pay period - The employee is required to work a specific number of hours in a pay period
STAT worked rate
STAT not worked rate
Vacation rate
Hire date - The date on which the employee joined the duty.
Time report start date -
Documents - Any files usually employee files such as insurances, identity cards, banks statements etc which can be stored under the employee profile
Messages - Communication messages between client and the accountant
Payroll date -
Hrlytotal
Stat worked hours
Stat not worked hours
Double overtime hours
Payroll processed -
Payroll not processed
Additional taxes to be deducted
FAQs
- I could not find the added client?
Ans: Insufficient information while adding a client can result in saving the client to incomplete clients. Go to incomplete clients, fill in the required details and save again.
- I could not find the added employee?
Ans: Insufficient information while adding an employee can result in saving the client to incomplete employees. Go to incomplete employee, fill in the required details and save again.
- I accidentally deleted a client?
Ans: The deleted clients will be available in the inactive clients.
- I accidentally deleted an employee?
Ans: The deleted employee will be available in the inactive employees.
- I could not login with the credentials my accountant has provided. Is there a separate login page for clients?
Ans: Clients also use the same login page at www.payrite.ca. Please contact your accountant to reconfirm your login credentials. Or you may reset the password which works only if the user id is correct.