
WIPFocus initial Setup
- Login to wipfocus
- Setup firm
- Setup task codes (WIP codes)
- Define/edit master entries
- Setup groupname (admin or users)
- Setup user job type
- Setup users
- Setup checklist
- Setup due date controller
- Setup clients
Login to Wipfocus
- Open the wipfocus desktop application
- To enter into wipfocus we need to give username and password
- When you install the wipfocus for the first time the default username and password is admin and 12345 that is the only username and password available when you open wipfocus for the first time
- Later you can change the username and password in the application by going to employee list you can add more implies
- The database location by default is available in the same location where the wipfocus exe is installed so you can choose that mastertable.MDB from the same location
- There is an option if you click the remember me checkbox button it will remember username and password, so you don't need to give every time the username and password.
- click ok and enter into the application.
Firm setup
When the application opens for the first time, you need to set up the firm details
- Else, click on File menu
- Click the firm setup.
Now enter general information such as firm name and address
- Click the save button or click update button if editing the existing information
If your business has more than one branch, that info can be added as well
- Click on the Add new button and fill the branch or second business details

Setup task codes
- Click on File menu
- Click Task codes
- A task details dialog will appear
- Now add the new work code(task code), task name, and other required information.
- Duedate category (tick for yes) (leave it unchecked for no).
- Select if the task is
- Chargeable
- Non-chargeable
- expense
- Click the add button
- You may change the details anytime if required from the tasks listed below by double clicking on the detail that is to be edited

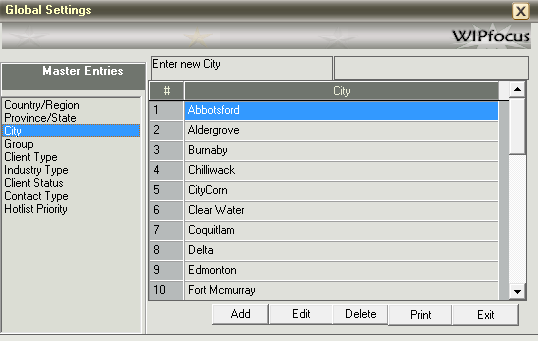
Setup and define master entries
Master entries is the place where all the short codes are defined. Here you can add new industry types, client types, provinces, cities etc.
- Click setup admin menu
- Click global settings (master entries)
- Now add any missing entries in the master entries window that appear
Setup groupname (admin or users)
- Click setup admin menu
- Click user groups (group name) in the menu
- The user group window will appear
- Now type the groupname and click apply button
- To edit the group name select the group name in the list.
- Make the changes for the group name by editing the text field and click apply button

Setup user job type
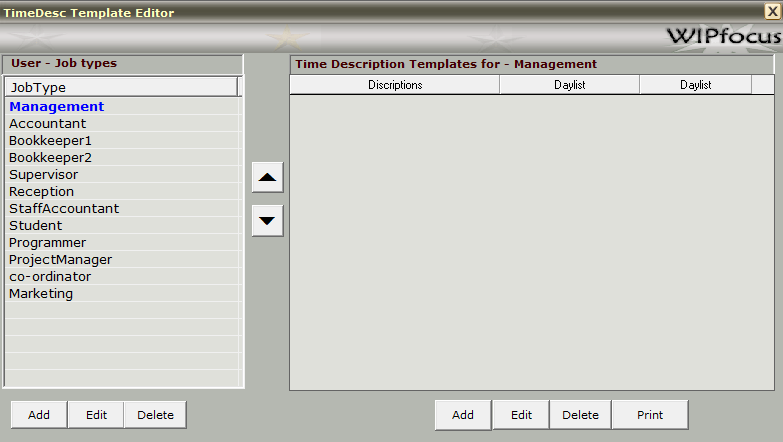
- Click setup admin menu
- Click job type (time desc template editor)
- Now add, edit or delete job type in the job type window that appears.
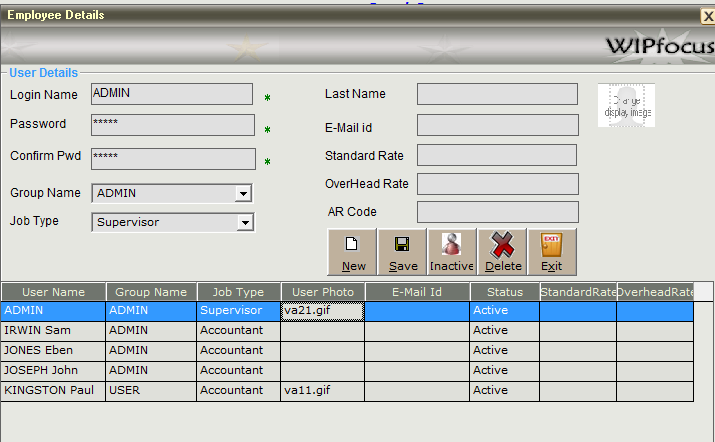
Setup Users
- Click the file menu
- Select user details. A new dialog will appear
- Click the new button
- Fill in the user details such as login name, password, group name and job type
- Click the save button
- The details can be edited at any time.
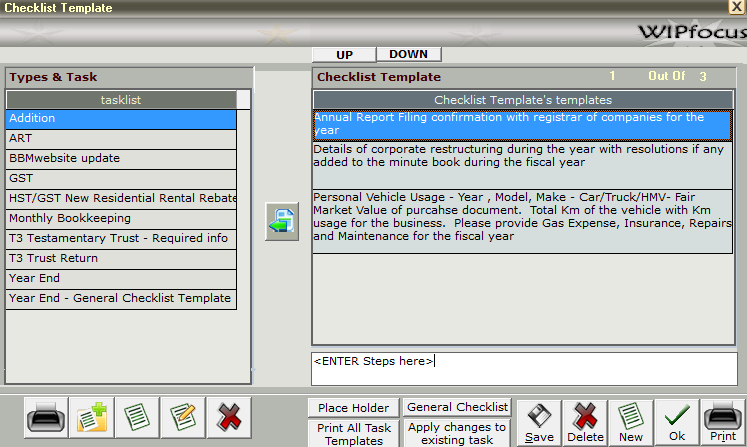
Setup checklist
When a staff works on a task, he/she can refer to the checklists for the task. Checklist can be client specific or of a common type
- Click setup admin menu
- Click checklist template editor
- Click button to create a checklist for an already defined task or click button to create a custom checklist
- Create checklist by adding the steps in the text field
- Click save and the checklist will be available.


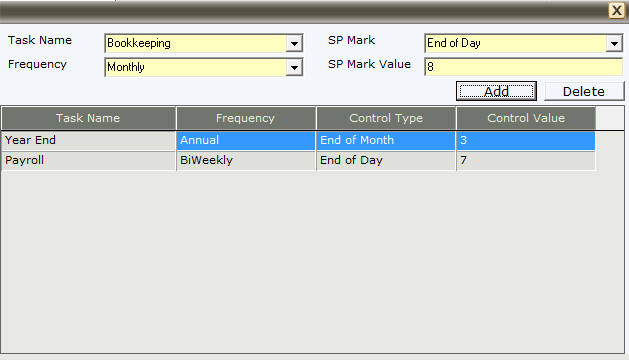
Setup due date controller
Due date controller is the place where we can globally define due dates for each task.
Let us assume we have a task Bookkeeping for a month say June
And this task has to be done every month
- So select Bookkeeping in the task name and
- Select frequency as monthly
Let us now assume that after the end of june the task must be processed and completed within a specific time of 8 days (or july 8th)
- So select end of day
- And input 8 in the sp mark value (control value)
Setup clients
- Click file menu
- Select new client>enter window or click button in the top toolbar
- A new dialog will appear
- In the Client tab fill in a short client Id and Client name
- FIll in other details such as address, email etc
- If you wish to add secondary contact, click on contacts
- Click on the primary contact in the contact list
- Click on the click to add button
- Add the contact details and click save button
- Now click on Admin tab
- Here you can set supervisor, accountant, reviewer for the client. (if left blank, the administrator can assign it to any staff when the task gets listed in task centre)
- Other client specific features include Notes, Check List, procedure, Banks can be added by clicking on the respective tabs.


Note: Select on any of the drop down field and click the click to add button to add new items to the dropdown. (say industry type, user type, city, state, country etc). The added client will be display in the client list by clicking on the button in the toolbar at the top.


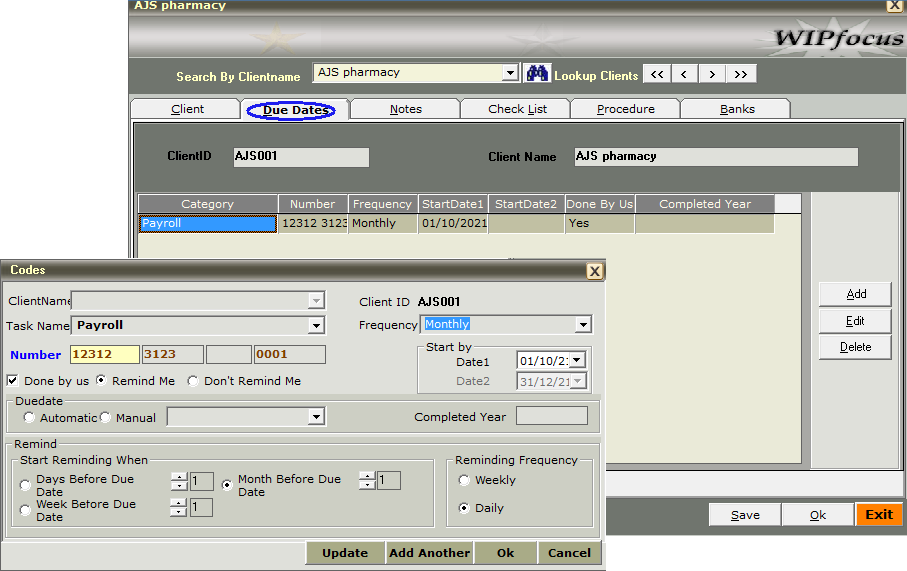
Setup tasks and task frequency for a client
What are client tasks- say a client has to do personal taxes every year. Here, the task is Personal tax filing and the task frequency is yearly
- Click on clients button in the top of the toolbar
- From the client list double click to select the client
- A dialog will appear
- Now go to Due Dates tab
- Click Add button
- Now fill in the task name, frequency, start by date
- Click ok button
The details can be edited any time by selecting the task and clicking on the edit button. While editing use the login password to make the authentication.
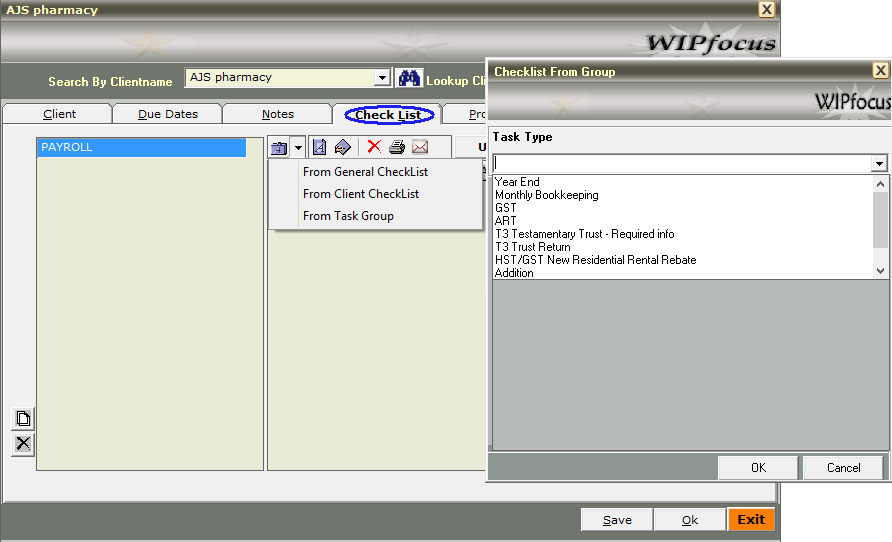
Define checklist & procedure for a client
- Click on clients button in the top of the toolbar
- From the client list double click to select the client
- A dialog will appear
- Now go to check list tab
- Select the task in the left side pane or Click Add new task button to add the task
- Now select the task and click general checklist template button to import an checklist existing checklist template from task group or from client chceklist
- Or click Add new checklist button to create custom checklist


Similarly procedures can also be defined for each client in the procedures tab of the client details window.
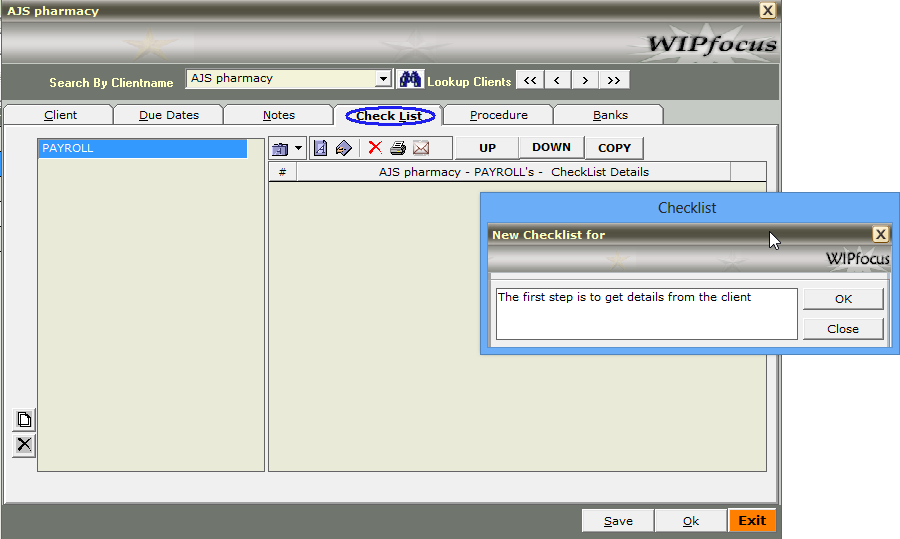
Create new custom checklist for a client’s task
- Click to create a custom checklist for this client’s task
- Enter the first checklist in the new checklist window and press ok button
- Again add multiple items to the checklist by clicking button.
- Now click save button

Assign staff to manage a client
- Open client details window
- Select client tab and select the secondary tab Admin
- Here you can set supervisor, accountant, reviewer for the client. (if left blank, the administrator can assign it to any staff when the task gets listed in task centre)

Plan upcoming client tasks with due date planner
Due date planner lists all the upcoming tasks that is associated with a specific period for a client based on the Due dates information provided in the client details
- Click the Duedates button from the top toolbox
- The duedates window lists all the upcoming tasks that are due for the month by default
- Select the start date and end date and click on the lookup button. Or use other filters to display tasks based on task name, accountant, client status etc.
- Now right click on the task that can be started and select any of the options such as ready to delegate, delegate to accountant or delegate to call.
- The delegated task will be moved to task centre automatically


Automate due date planner
Depending on the tasks’ end date and duedate set in the duedate planner, tasks are automatically generated and sent to the task center.
(Note: This reduces the hassle of going to duedate planner everytime to manually select and run the task.)
- Goto tools options in the menu bar
- Click on preference
- Now a dialog window will appear named Preference options
- Now select Duedate from the left side navigation pane
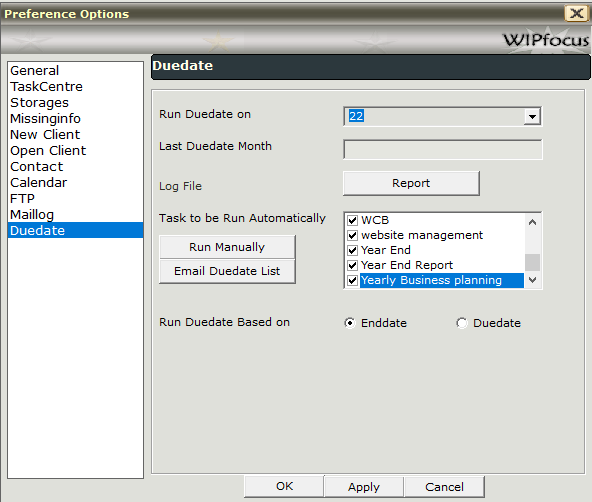
- Select a date from Run duedate on drop down.
- Select the required tasks from the Task to be run automatically field.
- Select on option for Run due date based on section. (Enddate option is recommended. Selecting duedate option may cause the tasks to appear late)
After setting up, whenever the specified date approaches, the duedate planner confirms the action to run duedate during user login.

Define and set Custom Task status (WIP status)
Wipfocus has the following default Task status icons to visualize the status of the task
Active task Review task Overdue task


To call On hold Email/ efile


You can set custom task status (WIP status) for tasks in WIPFocus. To create a custom task status
- Goto setup(admin) options in the menu bar
- Click on Task centre status
- Now a dialog window will appear named Task status

- Now, additional custom task statuses can be added here
- Add the task name, code (and percentage if necessary)
- Click on the add button
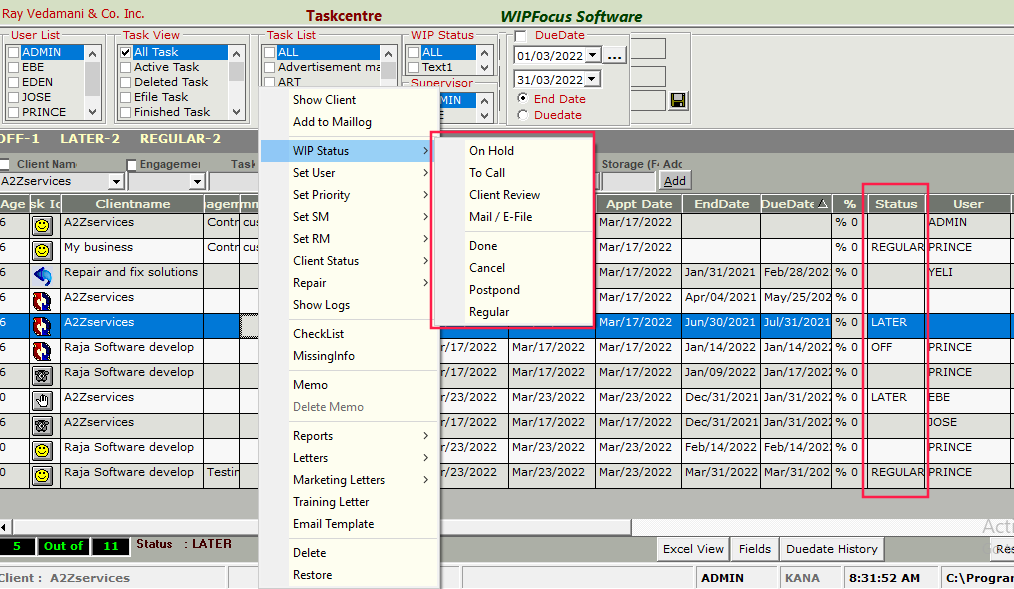
- Now right click on a task and goto WIP status submenu
- Click the desired status for the task.
Call and task notes
When a call is made to a client related to a task, the status of the communication can be recorded in call notes.
- click the tasks button and go to tasks screen
- Select the task which has WIP status set to to call
- Double click the to call icon
- To call notes window will appear
- Enter details of communication with the client in the notes and click save button.The entered details will appear in the notes details below.


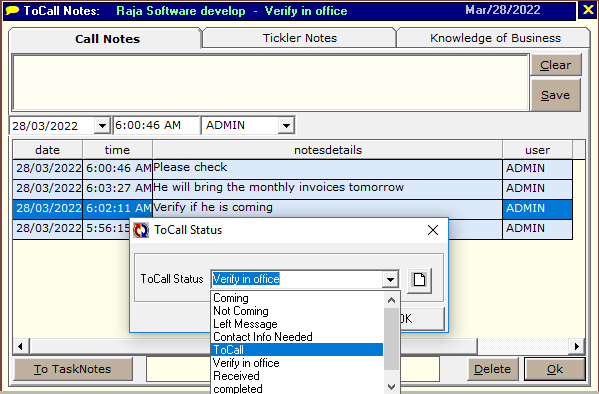
- Click on the ok button
- Now a Tocall status window will appear
- Select a tocall status click ok button
- Now the call notes is updated for the task and it will display icon. The last recorded note will display as a tooltip.

Record and manage missing info, reminder email to client
- Click tasks button to goto tasks screen
- Right click the task and click checklist

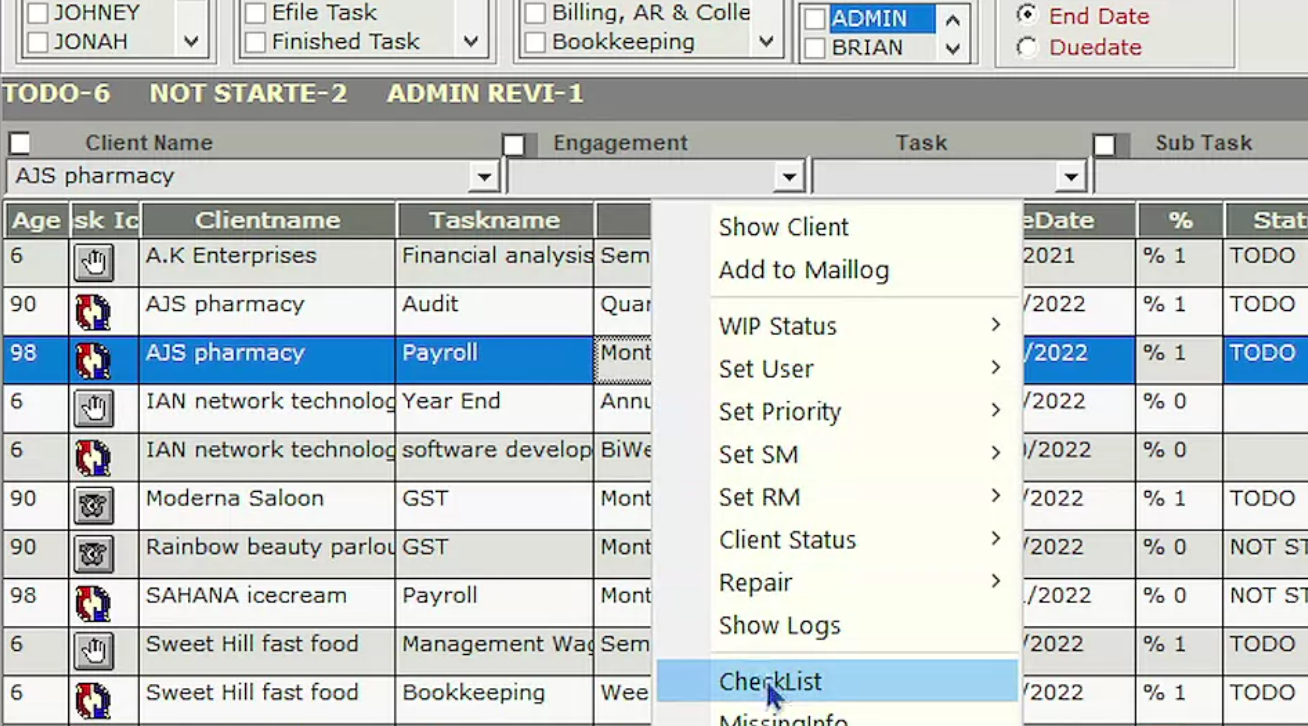
- Tick the check mark
 to strike-through the information that is readily available in the info required column.
 - Click the
 Add new missing info button to add more required info
 - Click the Send to missing info button
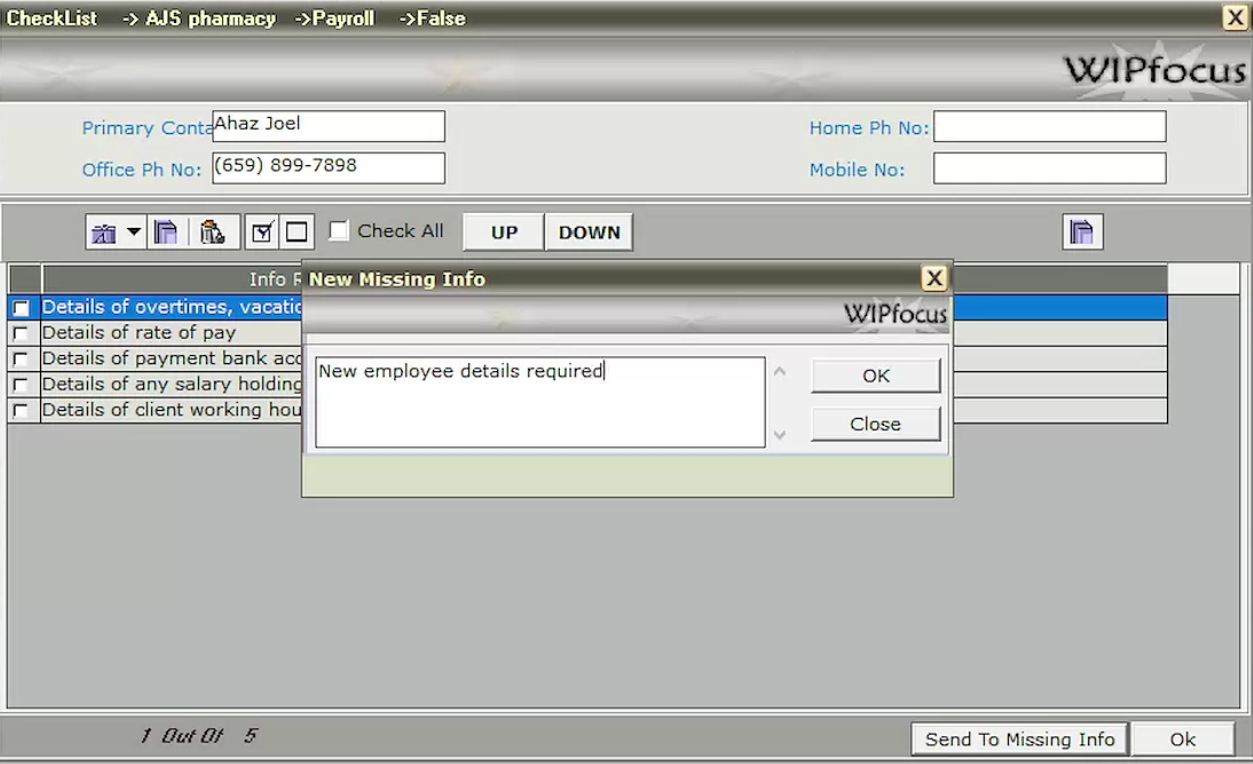
- Now click the
 missing info button to go to the missing info screen.
 - Click on the task and make a check mark to strike through the available information in the list. See the history tab for completed ones (i.e. all missing info are received from client)
- To add comments for a missing info, select the missing info and click the reply button.

- Now click the
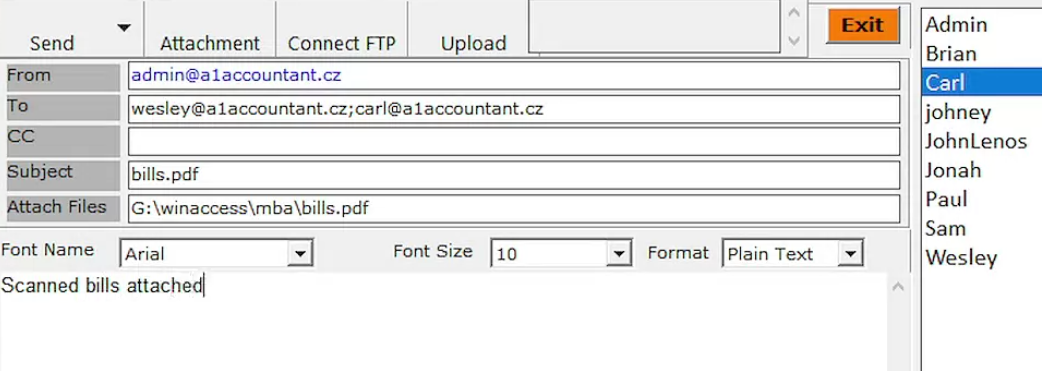
 email button to send a missing information reminder email to the client.

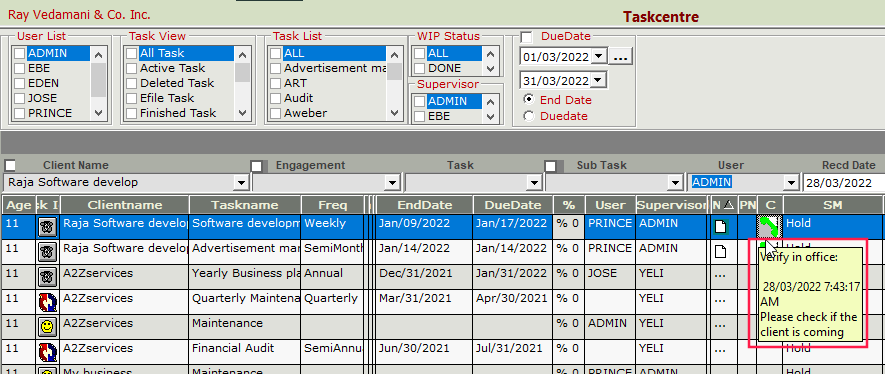
Assigning a task to user from task center
Tasks are always listed in the Duedate planner by duedate. Delegated tasks appear in the taskcentre. From here the status and progress can be monitored.
- Click tasks button from the top toolbar
- Select the task that needs action, and check if there is a need to change User, supervisor etc.
- Set priority for the task from the right click context menu.
- Also check other details and simply double click on the fields to make the desired changes.
- Call notes can be recorded or reviewed by clicking on the icon
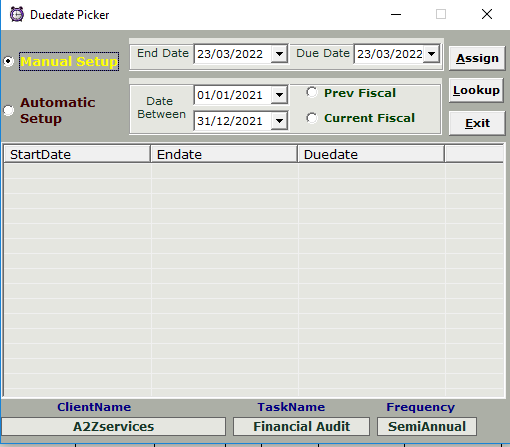
- Set up a custom due date if required for the task by double clicking on the duedate field of the task. A duedate picker window will appear. Select manual, select end date and duedate and click the assign button.


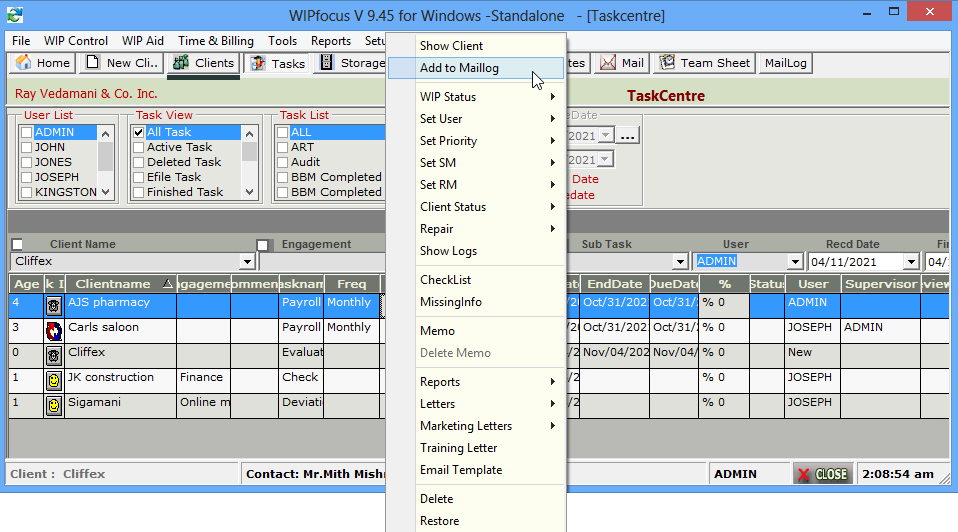
- Right click on the task and select Add to Mailog. After adding the task to mailog, the task is ready to be processed by the user and will be available in Mailog.
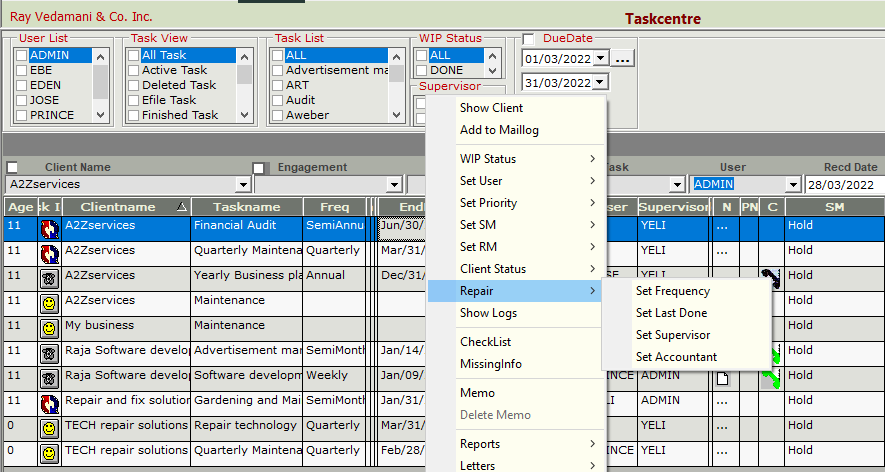
Repair task attributes
Sometimes a client's task attributes may change such as task frequency, accountant, supervisor etc. These details can be changed in the client details.
This can be updated for the tasks that are already in progress for the client in the task center.
- Right click on the task
- Select the repair menu
- Select the task attribute that has to be updated
Mailog task progress reports and status
All the tasks allocated to a user are listed in the user's mailog workspace. The users start to work on their allocated tasks and record information on how the task is processed, progress, time taken for task completion etc., from maillog. Users can also interact and share documents with the reviewers.
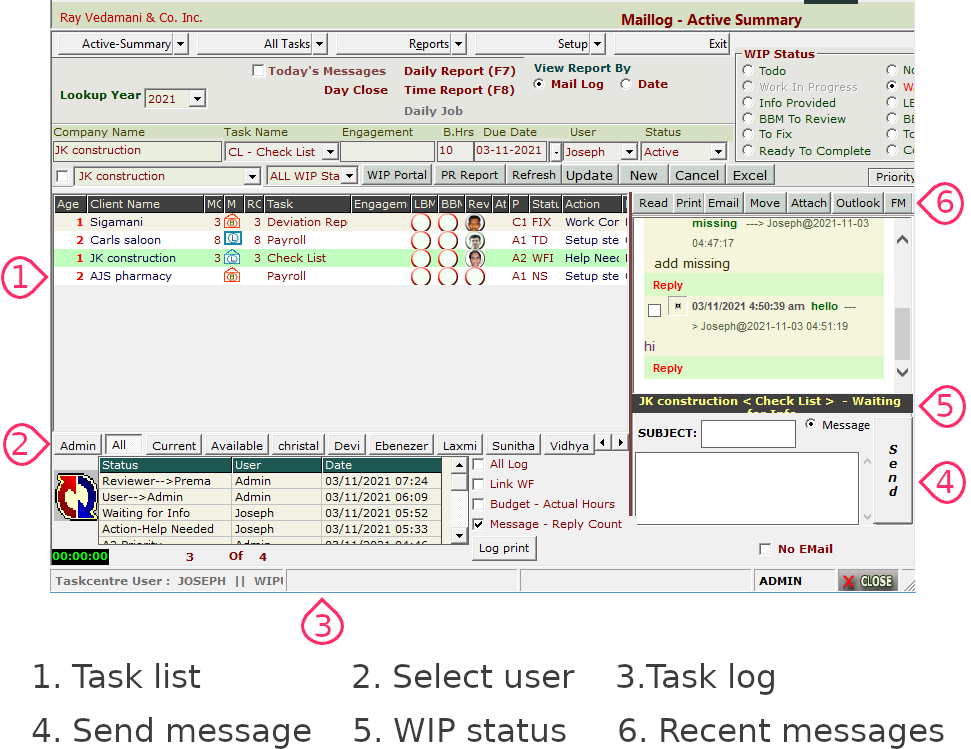
View and manage tasks assigned to an user:
- Select the user name displayed below the task list.

- Right click the maillog task to assign reviewer, supervisor and admin.
- Set priority such as A1, A2, B1 etc., from right click menu.
- Set percentage completion status for the task from the right click menu.
- Select the task to set a status from the action list.

Add a quick task or update an existing task’s attributes
- Click the mailog button to open mailog screen
- Click the new button
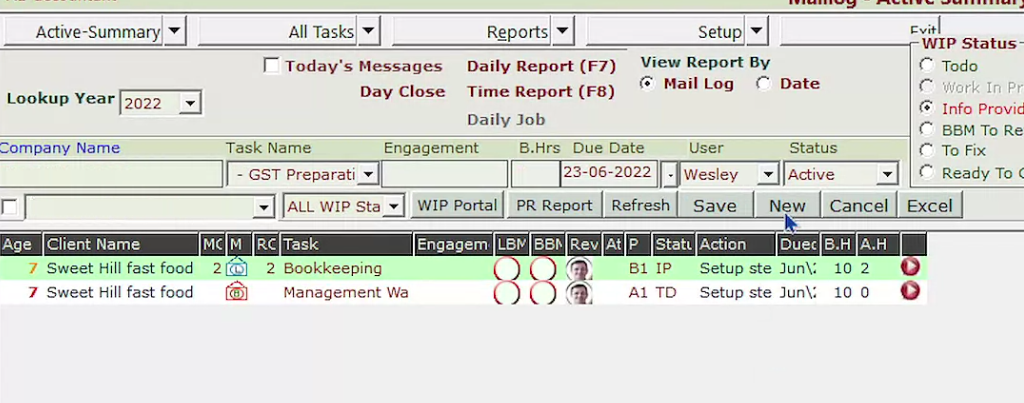
- Select the Company name, taskname, user, admin and duedate
- Click the save button to list the new task in the maillog tasklist
In a similar way, select the task and change the duedate, user, status etc., click the update button to change the task attributes.
Start a task, record progress and time taken
- Open mailog and click PR report button
- Click add new button to create a to-do list of subtasks.
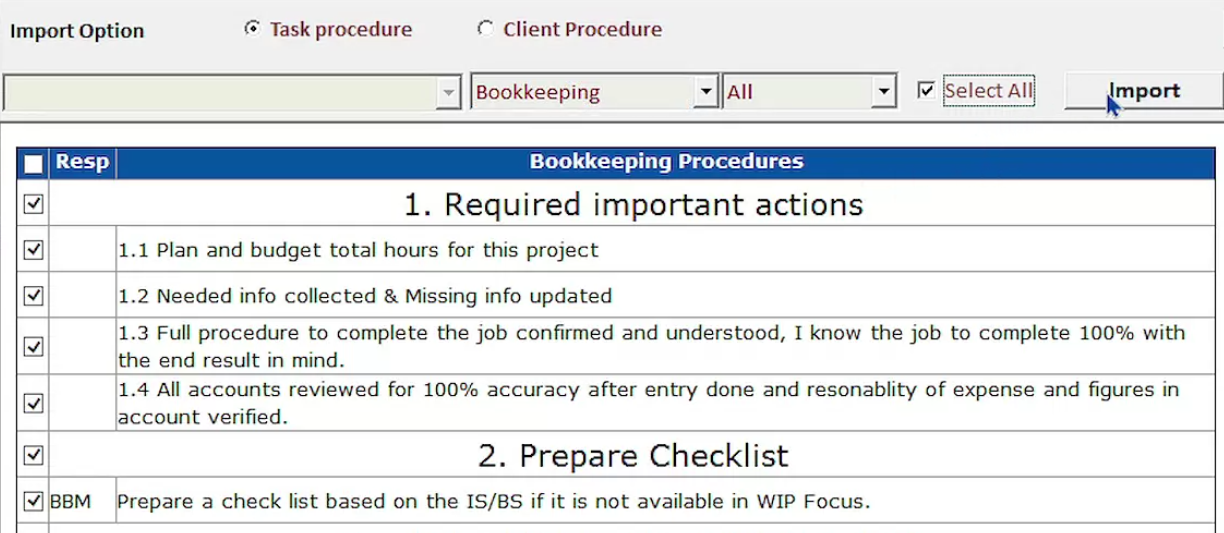
- Click the Task import button to import an existing to-do list from task procedure or client procedure.
- Click the import button
- Now select the imported procedures and click Add to plan button

- Click the daily report and open the to-do list of subtasks
- Click the Start button to start the subtask. Once the subtask is complete click the stop button. The time taken for the entire task and its subtasks are automatically logged.

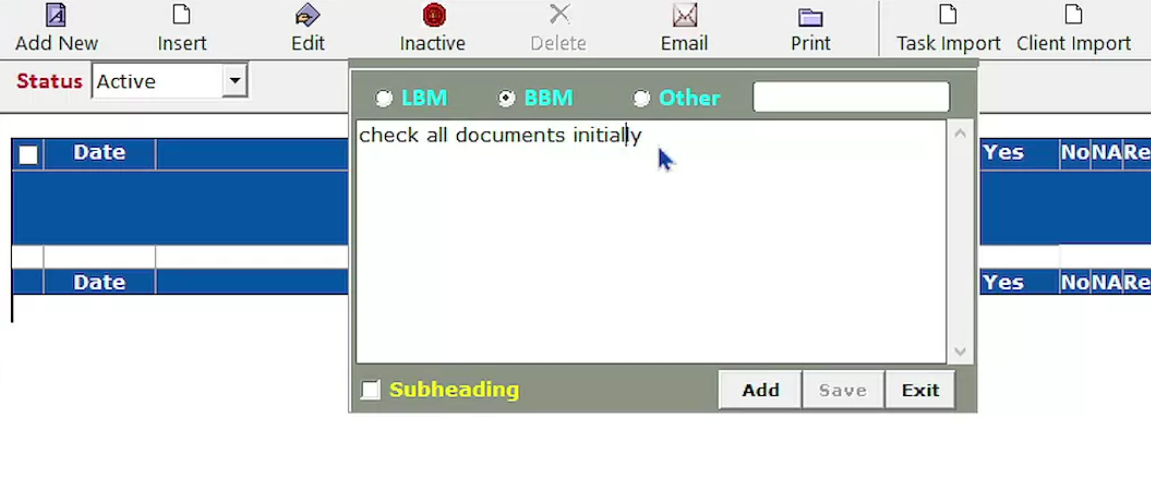
Create to-do list template in task procedure
The template created in task procedure can be imported to create to-do lists in PR Report

- Click setup dropdown menu and select procedure template
- Select a task from the task list in the template editor
- Click the add new button to create a list item or edit button to modify the list item
- Group similar subtask items by category using the subheading tag


Maillog Messaging
- Select the task to view the messages sent or received in the chat window.
- To send a new message, select the task, input the subject, enter the message, and click the send button.
- Click the attach button to send messages with attachments
- A new unread message appears or
- Read message appears or
- Right click the task and select change mail status menu to mark a message read or unread.


WIP status messages
- WIP status are clickable messages to describe the task status.
- WIP status is displayed below the chat window.
- Users can set WIP statuses for the task by selecting the task and selecting one of the WIP statuses such as Not started, waiting for info, to invoice, to fix etc.
Log all calls and emails
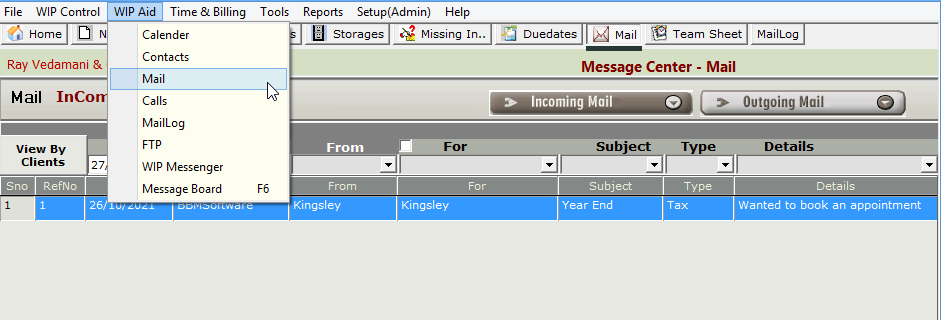
- Click wp aid from the top menu bar
- Click on calls to log all incoming and outgoing calls or click on mail to log all incoming and outgoing emails
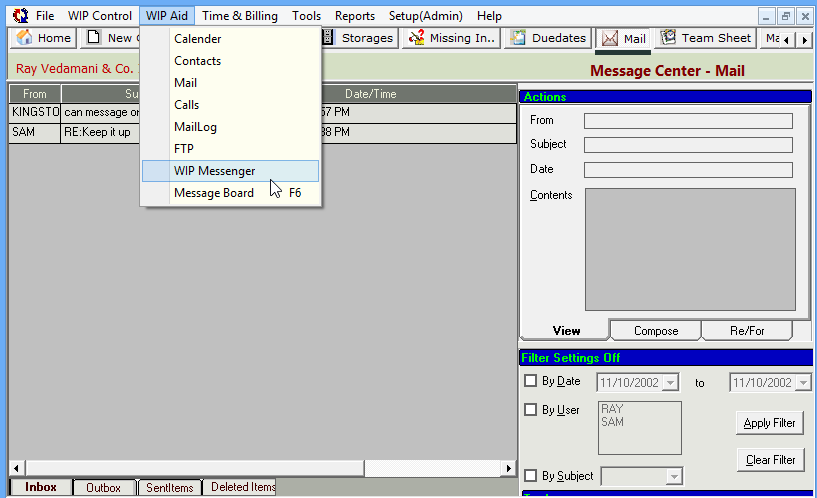
Messenger
WIth wip messenger all wipfocus users can be sent messages and receive messages. The messenger act as communication between admin and users only.
- Click WIP aid in menu bar
- Click wip messenger
- Here messages can be sent from the compose window
- All the messenger communication will be organised respectively in inbox, outbox, sent items and deleted items.
- Also select WIP aid in menu bar there is an option called Message Board. Keep messages here for everyone to see.
Import clients
- Click tools in the menu bar
- Now click import options
- Select what to import from the wipfocus master tables section.
- Now click the show fields button
- Now select the file in the excel path
- Match database fields with excel sheet fields and start import

Definition
Duedate category - A task that must be completed before a specified due date
WIP codes
Firm
Tasks
Chargeable
Non-chargeable
Expense